Wednesday, February 24, 2016

6th Grade: Mehndi Hands

Mehndi, what is that?
2.JPG9.jpg
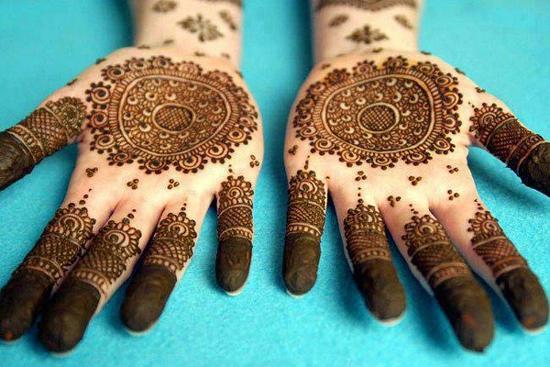
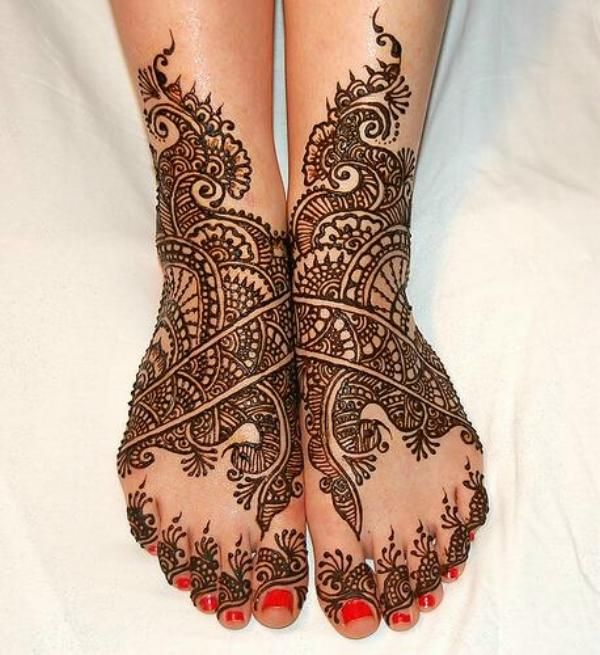
Mehndi is the art of painting the hands or feet, or even the body, with a paste made from dried henna leaves. It creates a stain that ranges from bright red to a dusky brown, but this color is prone to fading with time and strength and quality of the paste you make.

Mehndi started in Egypt over 5,000 years ago and has been used for various artistic and religious uses ever since.Here in the West, it has become popular as a temporary form of tattooing.

Different cultures created different styles of applications. Whether it is the geometric patterns popular in North Africa or the fine designs of India and Pakistan the patterns are created by applying the paste to the skin. Allowing the paste to dry stains the skin and brings the vibrancy of the colors out.
Traditional weddings in India are occasions for brides to be adorned with henna. The Hindu tradition calls for both the bride and groom to attend the henna painting, along with friends and family. This event, prior to the actual wedding is an observance of the Mehndi art as he paints the bride with traditional symbols that can take on a festive atmosphere.

An additional, and older practice, is to mark the end of Ramadan, the Islamic month of fasting, with getting henna tattoos. These designs celebrate the success of Ramadan, which includes abstinence from paying attention to your own physical looks and beauty. To celebrate, Mehndi artists paint intricate designs on Muslim women.

Although henna has been used as a celebratory event for generations, the important thing to remember about Mehndi is that it is a social event. Friends and family can gather to apply henna tattoo, not for religious or ceremonial use, but as a way to socialize and create beauty.
 History of Mehndi

Students began their Mehndi design on paper before transferring their ideas to the rubber glove. Gloves were to include a varied of patterns and different types of radial designs.

Student wore their gloves as they draw their patterns; invoking the feeling that the intricate patterns were becoming part of their own skin. 

When we finished drawing, the gloves were stuffed with batting to the base of the palm leaving room for a foam cup to be used in the wrist for a base.

Hints: 
  • Rubber-bands can be used around the wrist to help straighten out the wrinkles while drawing. Just be careful not to twist them around too tight.
  • Sharpie markers are a must, but can still smudge if handle to much.
  • Rubber gloves and tear easily, be careful.
  • And a special thanks to Valerie Heath for lesson plan!
  • And Dick-Blick for the great ideas! Here is their art-lesson on Mehndi Design


8th Grade: Painted Tiles

Many thanks to Brenda Kane and the Dowling art students who helped us our with special project. These wonderful people stopped by St. A to show our kids how to design and glaze tiles. It gave them a taste of what they could expect if they attend Dowling Catholic High School for their art program. The tiles turned out great! It also motivated several of my students to sign-up for art classes for next year. Makes me proud to see they want continue their art education.


2nd Grade: Mix Media Bird Houses

Second grade created these adorable bird house in hopes of Spring soon to be upon us.
We observed the texture found in wooden boards and recreated what we observed with crayons and watercolors. The wax in the crayons creates a resist that pushes away the water in the watercolors leaving a really cool effect on the paper. (Science is AWESOME!)

On another sheet of paper we colored a background that matched a different times of day that our birds would be experiencing. 
We added some trimmed green a paper and set to work building our houses out of our 'sheet of wood'.  Soon the birds started to flock to our homes. Chirp, Chirp!

1st Grade: Morph Scissors


 I love the unexpected in art and my 1st graders delivered.
Their job was to the trace the out-line of their scissors, then morph that shape into something unexpected. I showed them my example of a girl juggling balls in the circus. My picture got lots of 'OOOs' and 'Aahhs'. 'I'm going that with mine!'
Then, I announced that my idea was off limits which forced them to stretch their imaginations to come up with their own ideas for their pictures.

Two rules for this project:
1. Students had to trace the scissors in some way
2.  Keep their idea a secret till the very end of class.
(Keeping a secret can be so fun! I allowed them to whisper their ideas to me and promised not to share them.)
Superhero
Fire Dragon
Fish
Cartwheel
Day of the Dead Skull
Their ideas turned out way better than mine. I really like the Day of the Dead skull. Good call back from the beginning of the school year. And that dragon sure looks scary!

Wednesday, February 10, 2016

Bid 4 the Kids Auction Donations

Bid for the Kids here at SFA was last weekend. Just tooting my own horn of some artwork I created for the auction. Don't know what it went for, but I am glad it sold! So glad I could help out my school.
 Crucifixion created in foil 
Clay and Multi-Media
Bleeding Heart Cross

7th grade: Non-objective Paintings and Color Wheel

Seventh graders did an amazing job demonstrating that art does not have to be a recognizable subject to be a valid piece of artwork.
Non-objective art, unlike Realism, does not represent objects known in physical nature. The artwork creates an interesting composition using the elements of art (line, shape, color, texture, form, value, and space).
 Example of non-objective artwork by Wassily Kandinsky:
Wasilly Kandinsky – “Yellow, Red, Blue” – Oil on canvas – 1925.  “Abstract art places a new world, which on the surface has nothing to do with ‘reality, next to the real world.”  “There is no must in art because art is free.”
Students were giving a list of requirements before they began. Then, they sketched out a few ideas to practice their own compositions. The students then transferred the final pick to their canvas.

  • Three circles, two need to intersect
  • One geometric shape
  • One organic shape
  • One complex shape
  • Three different types of lines
  • Finish by painting lines black to bring unity to artwork
  • Using only the Primary colors, show sections that are painted red, orange, yellow, green, blue, and purple. (They could invent other colors too, if time allowed.)

I love recycling when every we can, so our canvas were from cardboard boxes.
So many variations within limitations. Great job!