Wednesday, November 11, 2015

2nd Grade: Claes Oldenburg

Second grade observed and critiqued the work of the artist Claes Oldenburg in order to get the idea of what colossal really means. Well, Claes Oldenburg knows how to do large! We have one of his sculpture here in Des Moines called Crusoe Umbrella. It is a humongous umbrella that takes up an entire street corner. This sculpture was a perfect tie into the lesson because nearly every student had driven past it at some point.
Crusoe Umbrella
Crusoe Umbrella
By Claes Oldenburg
Nollen Plaza, Civic Center of Greater Des Moines, Des Moines, Iowa
Photo: Attilio Maranzano

Crusoe Umbrella
Crusoe Umbrella
By Claes Oldenburg
Nollen Plaza, Civic Center of Greater Des Moines, Des Moines, Iowa
Photo: Attilio Maranzano
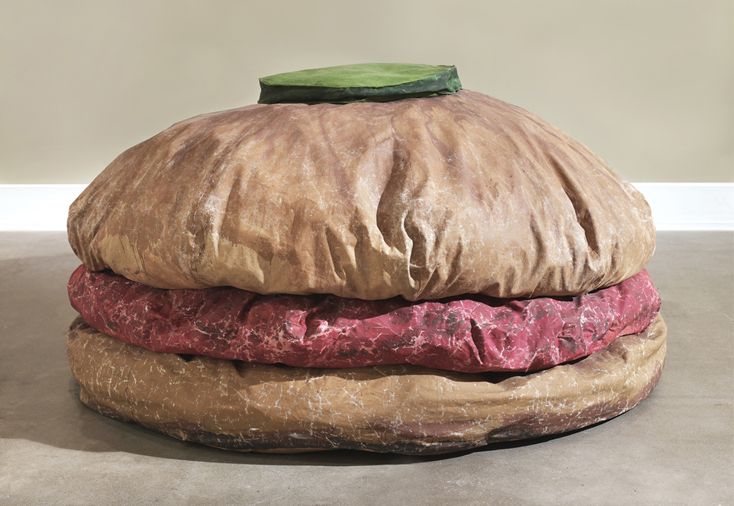
We also looked at his soft sculptures like his Floor Burger, Floor Cake, Floor Cone, and Fries and Ketchup.
 Soft Sculpture   Claes Oldenburg (b. 1929),French Fries and Ketchup, 1963. Vinyl and kapok fibers, 10 1/2 × 42 × 44 in. (26.7 × 10⁶ .7 × 111.8 cm). Whitney Museum of American Art, New York; 50th Anniversary Gift of Mr. and Mrs. Robert M. Meltzer  79.37a-g. © Claes Oldenburg. Photograph by Geoffrey Clements

These soft sculptures inspired us to create some sculptures of our own. Since, this is the month of November we tried to create food items we were thankful for, keeping the meaning Thanksgiving in mind.

As you can see, Ice cream, pizza, and McDonald french fries were top on our lists.  Yummy.

DAY 1:
We drew our food on a large sheet of paper, colored it, then cut out our shape with a second paper underneath; now have a front and back to our sculpture. Cutting two sheets guarantees that the front and back will match. For students that struggle with cutting out such huge pieces I used a binder clip to help hold papers in place or had a friend help hold them together as they cut.

Before we colored the backside we line-up our papers to be sure we colored the correct side. If you don't line up your paper, then fip, coloring might end up inside of the sculpture. Oh, no!

We then had to figure out what the back of our food would look like and color that side. (Example: pizza would show crust, compared to ice cream that might look the same as the front.) 

BETWEEN ART TIMES:
 In years past I had the kids sew their parts together, but this took too much time and several kids got pretty frustrated. Glue worked brilliantly, but a grown-up has to do the fastening.
Glue a thin line on of the very edge of the inside shape, being sure to leave a section unglued for later stuffing. Lay the layers together and let them dry. They tend to curl, so you may need to weigh them down.

When dried, the food will be nice pockets to stuff with crumpled newspaper.


DAY 2:
Students stuffed their foods with tiny bits of crumpled paper then I stapled it closed. Be careful not to over-stuff because they may tear.
Their sculptures turned out super cute and look fantastic for our Thanksgiving display. 

Add-On: 
For those that finished early or it can be used as a pre-worksheet.

Wednesday, November 4, 2015

6th Grade: Scrolls and Value

 6th  Grade have been sharpening their value skills by undertaking a project called 'Value Scrolls'.

Value:
First, draw scrolls with a pencil.
We drew a few scrolls as a class on the white-board; experimenting if they were rolled slightly different from each other. Easiest way is to start was with a squished swirl and then draw straight lines down from the edges our shape to the bottom of our paper. Don't forget to do the same on the inside, stopping with you hit the swirl lines. (I made a quick tutorial in Paint. Forgive the quality.)


Second, shade the scrolls with pencils. 
I demoed some 'real-life' paper scrolls, holding them up to a lamp to show which sections would be highlights and what parts would fall into shadows.
Heavier pressure was used for the shaded area, lighter pressure for the highlight areas, and left our paper white for where the light would hit the scroll directly. Smooth gradients turned out the best.

We gave our pictures a finishing touch by adding a background and color to our scrolls.
Color to our scrolls had to be done carefully; keeping in mind that the shadow areas would require heavier pressure and lighter pressure where the light hit the strongest. 


Day of the Dead: More art!

We have been so busy getting ready for Day of the Dead! Here are some more projects my kids have been working on.

Tin art Calavera by 7th grade:


 Paint and oil pastel Sugar Skulls by 8th grade:

Bones in Action by 2nd grade:
Can you guess what they are up to?

Rock Sugar Skulls by 3rd grade:


7th Grade: Value of Words

Constantly being aware of your pencil pressure can be a real challenge if you are not used to it. So, 7th Grade has been sharpening their value skills by undertaking a project called 'Value of Words'.

Students first had to use their math skills to measure out an evenly spaced grid. Then, they had to think of two different words that would fit on the top and far left row. The length of their word depending on how many column and rows they created. (Only school friendly words were excepted.)

Each letter was repeated down/across the column and row, rotating the letters as they went; this lead to some interesting division space within their rectangle. We found that capital letters that touch the edge of our boxes worked best.

When students were ready for shading, I offered two different options for filling in their spaces.  They could fill their spaces with a gradient or within the square spaces they shows a varied of values as solid tones.
Some students challenged themselves by picking colors pencils to show value. 
Those that struggled seemed to find some relief if they traced over their lines first in marker before shading. The marker helped keep their lines in places when they needed to erase or adjust their spaces.

1st Grade: Crazy Birds


First grade has created birds for the world of folk art. This project was a combination of tempera painted bird shapes with multimedia details for the feathers, claws, beaks, etc.
My key objective for this project was to *create patterns (not just the shape of the bird). The first graders took a day to paint the bodies of their birds with thick patterns and colors. I love the colors they used! After the paintings were dry, students added their multimedia (coffee filters, feathers, buttons, beads, pipe cleaners, gems...)
*folk art usually has fun personalized patterns